
Now that you’ve mastered Squats and Pushups, let’s focus on the Windmill Stretch. While this is more of a stretching-type exercise, it also goes a long way in improving overall mobility and is a great way to self-assess your own movement on a daily basis.
Most people cringe when they think of stretching and, I’m the first to admit, I even fall into that category. Over the past couple of years, however, I’ve taken a different approach when it comes to stretching/flexibility and focus more so on mobility and how I can improve my overall movement. This correlates to performing much better in my daily workouts and having a body that feels much better.
I was first introduced to the Windmill Stretch by strength coach and author Dan John, who likes to use a “minimalist” approach to flexibility and mobility work. Coach John focuses on exercises that get you the most bang for your buck. In other words, they have to do a lot of good things in a short amount of time.
The Windmill Stretch does just that by opening up the hips (great for those who sit a lot), and increasing mobility in the mid-back/thoracic spine (great for those who sit over a computer all day or are constantly looking down at their phones).
It’s also a great indicator for other areas that are or eventually may become a problem, such as tight pecs, tight or inactive hamstrings, and tight lats. As Coach John says, “where you feel this movement often indicates where your body is having issues.”


 If all is good with your mobility, you should be able to get your right elbow to the inside of the right knee. For most of you, however, this will be difficult! If you cannot get that elbow in, simply go to where your body allows and hold for 15-20 seconds before going back into your hinge position and then standing back up into your starting position. Perform about 3-5 sets of 15-20 second holds.

How To Do The Windmill Stretch
Step 1.
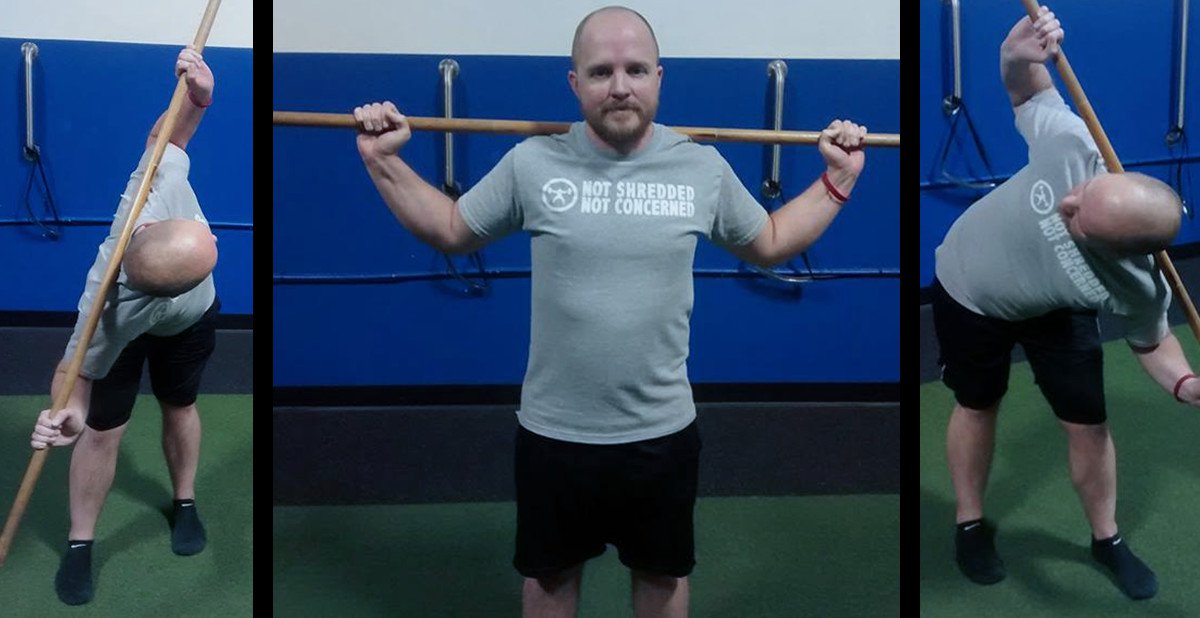
Grab a dowel or piece of PVC pipe (old push-broom handles work great for this) and place it across the shoulders as pictured. Think about tucking your elbows in and packing your shoulder blades. Don’t let your hands go out too wide on the dowel, rather, think about keeping them somewhat above your elbows.
Step 2.
With your feet at or a little bit closer than shoulder width apart, focus on performing a couple of basic hip hinges by pushing your hips and butt back until you feel a stretch in your hamstrings. Eyes should be focused about 6 feet in front of you. Keep the bend in the legs very minimal. Remember, this is a hip hinge, so you’re bending at the hips. Practice a few hip hinges and really try to master that motion. Pay particular attention to your hamstrings and how they feel as you hinge forward.
Step 3.
Next, slide your right foot slightly forward (about half a foot length so your toes on the left foot are lined up with the middle of your right foot). Perform a couple of hip hinges with that right foot slightly forward to get a feel for the movement.
Step 4.
Now comes the fun part! Keeping the same foot position as above (right foot slightly forward), hinge forward and then rotate your right elbow toward your right knee.
If all is good with your mobility, you should be able to get your right elbow to the inside of the right knee. For most of you, however, this will be difficult! If you cannot get that elbow in, simply go to where your body allows and hold for 15-20 seconds before going back into your hinge position and then standing back up into your starting position. Perform about 3-5 sets of 15-20 second holds.
Step 5.
Repeat the above sequence with your left foot slightly forward and rotate your left elbow toward your left knee.
Key Points to Focus on when performing the Windmill Stretch
- Pay attention to where you feel this movement most and this is most likely where you have issues. Common problem areas that people often notice with this move are hamstrings, hips, t-spine (mid back) and chest.
- Don’t worry if you cannot get the elbow all the way to the knee at first…it will take some time for your mobility to improve.
- For some of you, the simple act of just performing and mastering the hip hinge is a good start. Once you can do that comfortably, you can add the foot stagger and rotation.
- This movement can be performed pre-workout, post-workout or in between exercises.
- Try to incorporate it 3-4 times per week.
- Keep practicing and you WILL master this movement and move better!
Image
About the writer: Ken Grall is a Certified Strength & Conditioning Specialist (CSCS) and owns and operates an Edge Fitness in Madison, Wisconsin. Learn more about Ken.