
Next up in my “Exercises You Should Be Doing” series is a pretty common move that uses a not so common piece of equipment: Slosh Pipe Lunges.
What in the world is a slosh pipe? Glad you asked! A slosh pipe is simply a piece of PVC pipe that is partially filled with water and then capped on both ends. Slosh pipes can come in a wide variety of lengths (5-9’ tend to work best) and sizes (3-4” in diameter/15-45 lbs. when filled with water).
While it may not sound like much, you’ll quickly discover just how demanding they can make not only your lunges, but also a wide variety of other common exercises.
While I wish I could lay claim to the slosh pipe idea, the fact is slosh pipes have been around for quite some time.

 When you feel comfortable, progress to a “Zercher” hold, where the pipe is held by hooking the arms under the pipe and securing it in the crook of the elbows. (pictures 3 & 4). A third variation is holding the pipe overhead in an arms extended position.

 Once you’ve established the placement of the slosh pipe, simply perform some basic alternating forward lunges to get a feel for how the instability of the water increases the challenge of the exercise. Be sure to keep your movements slow and controlled, focus on even movement, keep the shoulders tall and square, and concentrate on a smooth transition from the downward movement to the upward movement.
Focus on about 6-10 reps per leg for 3-4 total sets.
Once you’ve established the placement of the slosh pipe, simply perform some basic alternating forward lunges to get a feel for how the instability of the water increases the challenge of the exercise. Be sure to keep your movements slow and controlled, focus on even movement, keep the shoulders tall and square, and concentrate on a smooth transition from the downward movement to the upward movement.
Focus on about 6-10 reps per leg for 3-4 total sets.
What Makes A Slosh Pipe Effective
Because of the instability of the water moving back and forth in the pipe, your body must compensate by having your core and other stabilizer muscles do more work. For example, when you perform a basic forward lunge while holding a slosh pipe, you are not only adding the challenge of the weight of the water-filled pipe to the exercise, you’re also creating a situation where your body must balance and adjust to accommodate the imbalances created by the “sloshing” of the water inside. So even the most basic exercises like lunges, curls, squats, shoulder presses, etc. become more difficult because your muscles are engaged in a different way than with a regular weight like a dumbbell or barbell. Not only are you going to benefit from a strength standpoint, but you now also have balance, flexibility and coordination thrown into the exercise!How To Perform A Slosh Pipe Lunge
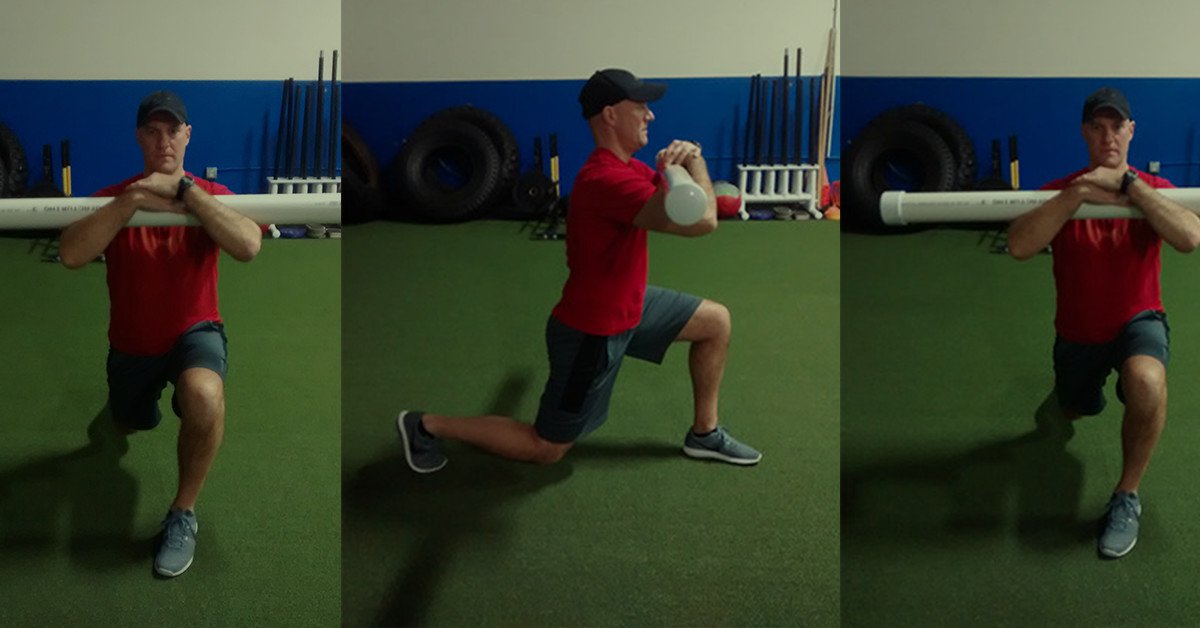
While a slosh pipe can be used for a wide variety of exercises, today’s article is simply going to focus on the lunge. As you become more comfortable with the slosh pipe, I suggest trying it for other exercises such as carries, squats, overhead presses, and core work. As you progress and become more comfortable with the feel of the slosh pipe, you can try different sizes and weights to best fit the various exercises. When performing a lunge with the pipe, there are a couple of different ways to hold it. I would suggest starting out with the pipe across the shoulders.
When you feel comfortable, progress to a “Zercher” hold, where the pipe is held by hooking the arms under the pipe and securing it in the crook of the elbows. (pictures 3 & 4). A third variation is holding the pipe overhead in an arms extended position.
Once you’ve established the placement of the slosh pipe, simply perform some basic alternating forward lunges to get a feel for how the instability of the water increases the challenge of the exercise. Be sure to keep your movements slow and controlled, focus on even movement, keep the shoulders tall and square, and concentrate on a smooth transition from the downward movement to the upward movement.
Focus on about 6-10 reps per leg for 3-4 total sets.
Image
As you master the forward lunge, feel free to incorporate the slosh pipe into your other lunge variations such as a reverse lunges, lateral lunges and walking lunges.
It’s okay if you feel a bit uncoordinated at first….the slosh pipe will do that to you!
How To Make Your Own Slosh Pipe
The great thing about making a slosh pipe (beside being super easy), is you should be able to make one for under $25. Your local home improvement store will have all of the materials and offer PVC in various sizes. Here are the steps on how to do it:Materials Needed for Slosh Lunges Pipe:
- PVC Pipe (3-4” in diameter) and 5-9’ in length
- 2 PVC end caps to fit the diameter of your pipe
- PVC Primer
- PVC Cement
- Water
Instructions For Making Your Slosh Lunges Pipe:
- Clean one end of the PVC pipe with a PVC primer
- Generously apply PVC cement to that end before securing one of the caps
- Allow it to dry for a few minutes before filling the pipe about ½ to ¾ full with water
- Clean the other end with PVC primer, apply PVC cement and cap the other end
- Allow the ends to dry for a few minutes and then get to work!