
If your low back is aching, you’re not alone. Approximately 80% of the population experiences low back pain at some point. Runners can be especially challenged by low back issues for many reasons, including the core stabilization required to hold the spine in a healthy position during running, as well as the tightness that running tends to cause on the psoas and hamstrings, each of which can cause constriction and pain in the low back. With so many potential causes for low back pain, it’s helpful to think about caring for the low back with yoga through three phases, rehab, recovery, and prevention.
Rehabilitation postures are directed at lengthening muscles and fascia that may be creating compression or imbalances in the spine. While they are definitely helpful when you are experiencing acute back pain, this restorative approach also useful following times that you’ve experienced a great deal of stress to your low back, such as following a long run or tough workout, or simply after sitting for several hours.
 Purpose: Lengthen both sides of the spine evenly and open sacral area.
How: Begin on all fours. Reaching arms overhead and forward, press hips towards heels and place forehead on the ground, taking knees wider than your rib cage. This can be modified by placing a block or pillow underneath the forehead or with a bolster or pillow behind the knees if you struggle to bring your hips down.
Purpose: Lengthen both sides of the spine evenly and open sacral area.
How: Begin on all fours. Reaching arms overhead and forward, press hips towards heels and place forehead on the ground, taking knees wider than your rib cage. This can be modified by placing a block or pillow underneath the forehead or with a bolster or pillow behind the knees if you struggle to bring your hips down.
 Purpose: Release tension through the sacrum and hips, gently release the gluteals.
How: While lying on your back, bring the right knee towards the outside of your right ribcage. Hold the knee in place by pulling with your interlaced fingers on the shin a few inches below the knee. Focus on breathing deep into the belly and low back. Repeat on the other side. Repeat with both legs towards the ribs. This can be modified by using a strap (or necktie) if you struggle to hold your legs well.
Purpose: Release tension through the sacrum and hips, gently release the gluteals.
How: While lying on your back, bring the right knee towards the outside of your right ribcage. Hold the knee in place by pulling with your interlaced fingers on the shin a few inches below the knee. Focus on breathing deep into the belly and low back. Repeat on the other side. Repeat with both legs towards the ribs. This can be modified by using a strap (or necktie) if you struggle to hold your legs well.
 Purpose: Gently open the hips, groin, and sacrum.
How: While lying on your back, bend both knees bringing them towards and wider than your ribcage. Take hold of the bottom of your feet while pressing them towards the ceiling and resisting that pull with the strength of your arms. If you struggle to reach your feet, you can use a strap to assist.
Purpose: Gently open the hips, groin, and sacrum.
How: While lying on your back, bend both knees bringing them towards and wider than your ribcage. Take hold of the bottom of your feet while pressing them towards the ceiling and resisting that pull with the strength of your arms. If you struggle to reach your feet, you can use a strap to assist.
 Purpose: Gently lengthen the hamstrings and each side of the lower lumbar. Gently round the spine and posteriorly tilt the pelvis.
How: With your right leg towards the right corner of the room, bring your left foot to your right inner thigh. Bend your right knee as much as you need to to bring your forehead to the knee, while bringing your interlaced fingers underneath the ball of your foot. Slowly straighten the leg to the extent that is comfortable for you while focusing on dropping the left rib cage and raising the right shoulder. Repeat on the opposite side.
Purpose: Gently lengthen the hamstrings and each side of the lower lumbar. Gently round the spine and posteriorly tilt the pelvis.
How: With your right leg towards the right corner of the room, bring your left foot to your right inner thigh. Bend your right knee as much as you need to to bring your forehead to the knee, while bringing your interlaced fingers underneath the ball of your foot. Slowly straighten the leg to the extent that is comfortable for you while focusing on dropping the left rib cage and raising the right shoulder. Repeat on the opposite side.
 Purpose: To release the piriformis while opening the hips and stabilizing the sacrum.
How: While lying on your back, bend your right knee with the foot on the floor near your bottom. Flex the left foot and bring the left ankle to the top of the right thigh. Press the left knee away from your body while focusing on rotating the left thigh outward and keeping the weight even on both sides of the spine. You can increase the stretch by clasping the back of the right thing and bringing it closer to the ribcage, while continuing to press the left knee away from your body. You can modify this by using a strap instead of your hands to pull the supporting leg in. Repeat on each side.
Purpose: To release the piriformis while opening the hips and stabilizing the sacrum.
How: While lying on your back, bend your right knee with the foot on the floor near your bottom. Flex the left foot and bring the left ankle to the top of the right thigh. Press the left knee away from your body while focusing on rotating the left thigh outward and keeping the weight even on both sides of the spine. You can increase the stretch by clasping the back of the right thing and bringing it closer to the ribcage, while continuing to press the left knee away from your body. You can modify this by using a strap instead of your hands to pull the supporting leg in. Repeat on each side.
 Purpose: To stabilize the sacrum, release the IT band, and increase thoracic mobility.
How: Lying on your back, bring both knees to the chest then drop them to the left side of your body. Bring both knees to the floor and align the top hip over the bottom. Roll your shoulders open in the opposite direction and open arms in line with the shoulders. Turn your head towards your right arm. Repeat on the other side. To increase the stretch in the IT band, you can straighten the top leg. You can modify this by placing a pillow behind your shoulders to provide support.
Purpose: To stabilize the sacrum, release the IT band, and increase thoracic mobility.
How: Lying on your back, bring both knees to the chest then drop them to the left side of your body. Bring both knees to the floor and align the top hip over the bottom. Roll your shoulders open in the opposite direction and open arms in line with the shoulders. Turn your head towards your right arm. Repeat on the other side. To increase the stretch in the IT band, you can straighten the top leg. You can modify this by placing a pillow behind your shoulders to provide support.
 Purpose: Release and open the psoas. Stabilize the sacrum.
How: Come into bridge pose with your feet on the floor and at hip distance. Place a yoga block underneath your low back. Release your weight onto the yoga block. Slowly begin to straighten your legs as comfort allows. This can be modified by using different heights of the block to allow for more or less lumbar flexibility.
Purpose: Release and open the psoas. Stabilize the sacrum.
How: Come into bridge pose with your feet on the floor and at hip distance. Place a yoga block underneath your low back. Release your weight onto the yoga block. Slowly begin to straighten your legs as comfort allows. This can be modified by using different heights of the block to allow for more or less lumbar flexibility.
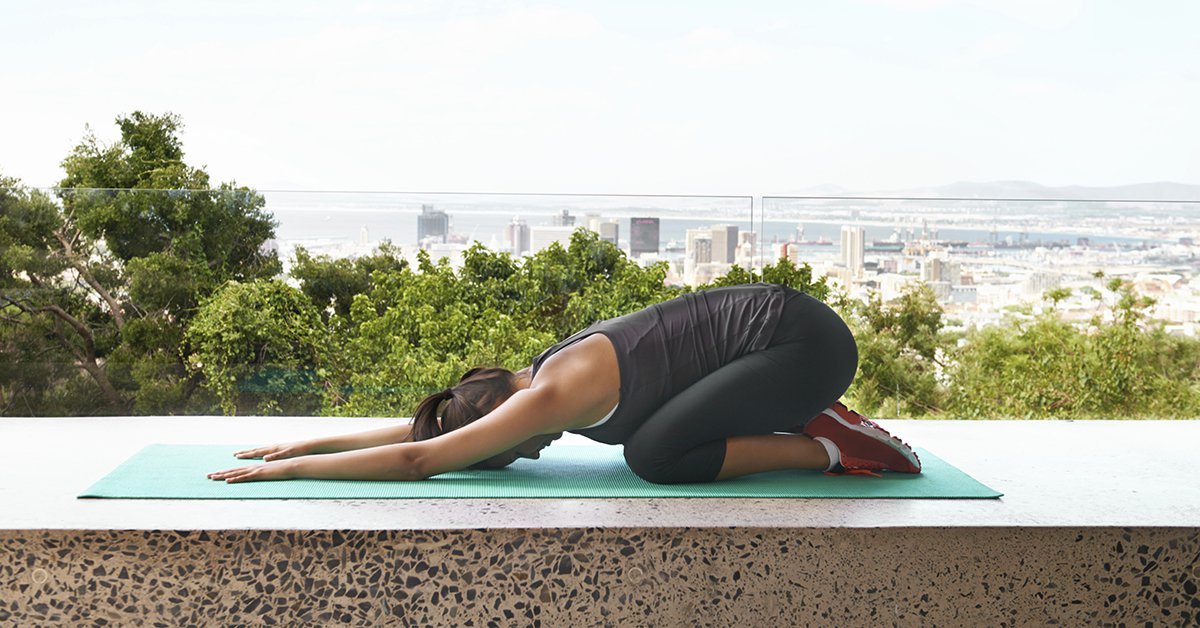
1. Child’s Pose
Purpose: Lengthen both sides of the spine evenly and open sacral area.
How: Begin on all fours. Reaching arms overhead and forward, press hips towards heels and place forehead on the ground, taking knees wider than your rib cage. This can be modified by placing a block or pillow underneath the forehead or with a bolster or pillow behind the knees if you struggle to bring your hips down.
2. Wind Relieving Pose
Purpose: Release tension through the sacrum and hips, gently release the gluteals.
How: While lying on your back, bring the right knee towards the outside of your right ribcage. Hold the knee in place by pulling with your interlaced fingers on the shin a few inches below the knee. Focus on breathing deep into the belly and low back. Repeat on the other side. Repeat with both legs towards the ribs. This can be modified by using a strap (or necktie) if you struggle to hold your legs well.
3. Happy Baby Pose
Purpose: Gently open the hips, groin, and sacrum.
How: While lying on your back, bend both knees bringing them towards and wider than your ribcage. Take hold of the bottom of your feet while pressing them towards the ceiling and resisting that pull with the strength of your arms. If you struggle to reach your feet, you can use a strap to assist.
4. Seated Head to Knee
Purpose: Gently lengthen the hamstrings and each side of the lower lumbar. Gently round the spine and posteriorly tilt the pelvis.
How: With your right leg towards the right corner of the room, bring your left foot to your right inner thigh. Bend your right knee as much as you need to to bring your forehead to the knee, while bringing your interlaced fingers underneath the ball of your foot. Slowly straighten the leg to the extent that is comfortable for you while focusing on dropping the left rib cage and raising the right shoulder. Repeat on the opposite side.
5. Figure 4
Purpose: To release the piriformis while opening the hips and stabilizing the sacrum.
How: While lying on your back, bend your right knee with the foot on the floor near your bottom. Flex the left foot and bring the left ankle to the top of the right thigh. Press the left knee away from your body while focusing on rotating the left thigh outward and keeping the weight even on both sides of the spine. You can increase the stretch by clasping the back of the right thing and bringing it closer to the ribcage, while continuing to press the left knee away from your body. You can modify this by using a strap instead of your hands to pull the supporting leg in. Repeat on each side.
6. Reclined Twist
Purpose: To stabilize the sacrum, release the IT band, and increase thoracic mobility.
How: Lying on your back, bring both knees to the chest then drop them to the left side of your body. Bring both knees to the floor and align the top hip over the bottom. Roll your shoulders open in the opposite direction and open arms in line with the shoulders. Turn your head towards your right arm. Repeat on the other side. To increase the stretch in the IT band, you can straighten the top leg. You can modify this by placing a pillow behind your shoulders to provide support.
7. Supported Bridge Pose
Purpose: Release and open the psoas. Stabilize the sacrum.
How: Come into bridge pose with your feet on the floor and at hip distance. Place a yoga block underneath your low back. Release your weight onto the yoga block. Slowly begin to straighten your legs as comfort allows. This can be modified by using different heights of the block to allow for more or less lumbar flexibility.
8. Legs up the Wall
Purpose: To gently stretch the hamstrings, stabilize the sacrum, and release the low back How: Lying on your back, bring your bottom close to the wall with your body perpendicular to the wall. Bring your legs straight and rest them against the wall. These rehabilitative postures should be used as a restorative practice. You can hold them for as long as comfortable, five minutes is ideal. As you practice them, you will learn which ones bring you the most relief and can focus on those at times when you need them. In the next portion of this blog post, we will focus on recovery poses, which introduce movement while maintaining the stabilization and opening that you create in these rehabilitative postures.Other Yoga moves for runners:
This article is part of the Yoga For Running series. Read the first article on Barre workouts, good for building lower body strength for runners, or the second article on how to stretch your hamstrings, which get tight from regular running.Image
About the writer: Joli Guenther is a certified personal trainer, yoga instructor and clinical social worker practicing in and around Madison, Wisconsin. Learn more about Joli.